
How to Capture Drone Photos for Processing
The quality of your processed outputs — orthomosaic processing, terrain modelling, and stockpile volume calculations — depends almost entirely on how well the site is captured before submission. This guide covers best-practice capture workflow for NZ conditions, so your imagery is ready to process to survey-grade standard.
Why Flight Technique Matters
Even the best processing pipeline can't recover poor overlap, inconsistent altitude, motion blur, bad lighting, or incorrect camera angles. Good capture technique ensures:
- Survey-grade accuracy
- Clean stitching
- Sharp orthophotos
- Reliable volume calculations
- Fewer re-flights
1.Plan Your Flight Area Properly
Walk the site or review it on a map. Identify no-fly zones, trees and obstacles, slopes or elevation changes, and areas requiring higher detail.
- Account for NZ Terrain
- New Zealand sites often include rolling hills, uneven paddocks, deep stockpiles, and wind-exposed ridgelines. Use terrain-following mode if available to maintain consistent ground sampling distance (GSD).
- Export a KML File from Google Earth
- We recommend outlining your flight area in Google Earth and exporting it as a KML file before you fly. This gives you a clear, georeferenced boundary you can load into your flight planning app (e.g. DJI Pilot 2, Litchi, or DroneDeploy) to ensure full coverage and no missed areas. Include this KML with your upload — it helps us understand the intended survey extent and flag any obvious coverage gaps in your imagery.
2.Use the Right Flight Settings
- Altitude
- 80–120 m AGL is ideal for most mapping. Lower altitude gives higher detail but more photos; higher altitude gives fewer photos but lower resolution. For stockpiles or earthworks, 60–80 m gives better volume accuracy. Always fly at a consistent height above ground level (AGL), not above your takeoff point — on sloped sites, use terrain-following mode if your drone supports it.
- Overlap — the most important factor
- Front overlap: 75–85%. Side overlap: 70–80%. For complex terrain or tall objects, increase to 85/85%. Insufficient overlap is the most common cause of poor stitching.
- Speed
- Speed depends on your drone type. Drones with a mechanical shutter (e.g. DJI Mavic 3 Enterprise, Zenmuse P1) can fly at up to 10–12 m/s. Drones with an electronic shutter only should fly at 3–6 m/s or slower to avoid motion blur. Always fly slower in windy conditions.
- Nadir vs. Oblique
- For standard topographic surveys and orthomosaics, fly at 90° (straight down). If you need a 3D model of structures or buildings, add oblique passes at 45–60° and consider a double-grid pattern to capture all vertical faces.
3.Use Consistent Camera Settings
- Mechanical Shutter
- Enable the mechanical shutter if your drone has one (e.g. DJI Mavic 3 Enterprise, Zenmuse P1). This eliminates rolling shutter distortion, which can cause warping in your outputs.
- Lock Exposure & Focus
- Turn off Auto Exposure and Auto White Balance. Lock ISO to 100–200 and set Manual Focus to infinity. Consistent exposure across all images is critical for clean photogrammetric processing.
- Shutter Speed
- Use 1/500s or faster to eliminate motion blur — 1/800s or faster preferred. In low light, increase ISO slightly rather than slowing the shutter.
- ISO
- Keep ISO low (100–200) to reduce noise and maintain image quality.
- Aperture
- Most drones use fixed aperture. If adjustable, use f/4–f/5.6 for sharp, well-exposed images.
- White Balance
- Set to Sunny, Cloudy, or Manual — never Auto. Auto white balance causes colour shifts between images that disrupt clean stitching.
- Image Format
- JPG is sufficient for most jobs and processes faster. If your drone captures RAW, export JPG alongside it.
4.Fly in the Right Conditions
- Lighting
- Overcast days are ideal. Flat, diffused light reduces harsh shadows and bright spots that can confuse photogrammetry software. Avoid flying in patchy cloud where lighting changes mid-mission.
- Best Time of Day
- If flying in sunny conditions, fly near midday to minimise shadow length. Long shadows from early morning or late afternoon flights can obscure surface detail and distort point cloud and DSM outputs.
- Weather
- Light winds only. No rain or drizzle. Avoid harsh midday sun on reflective surfaces such as stockpiles or metal roofs.
- NZ-Specific Tip
- New Zealand's weather changes fast — always check MetService, Windy, or UAV Forecast before flying. A flight delayed by an hour often makes the difference between great imagery and a re-fly.
5.Use Ground Control Points (GCPs) for Survey-Grade Accuracy
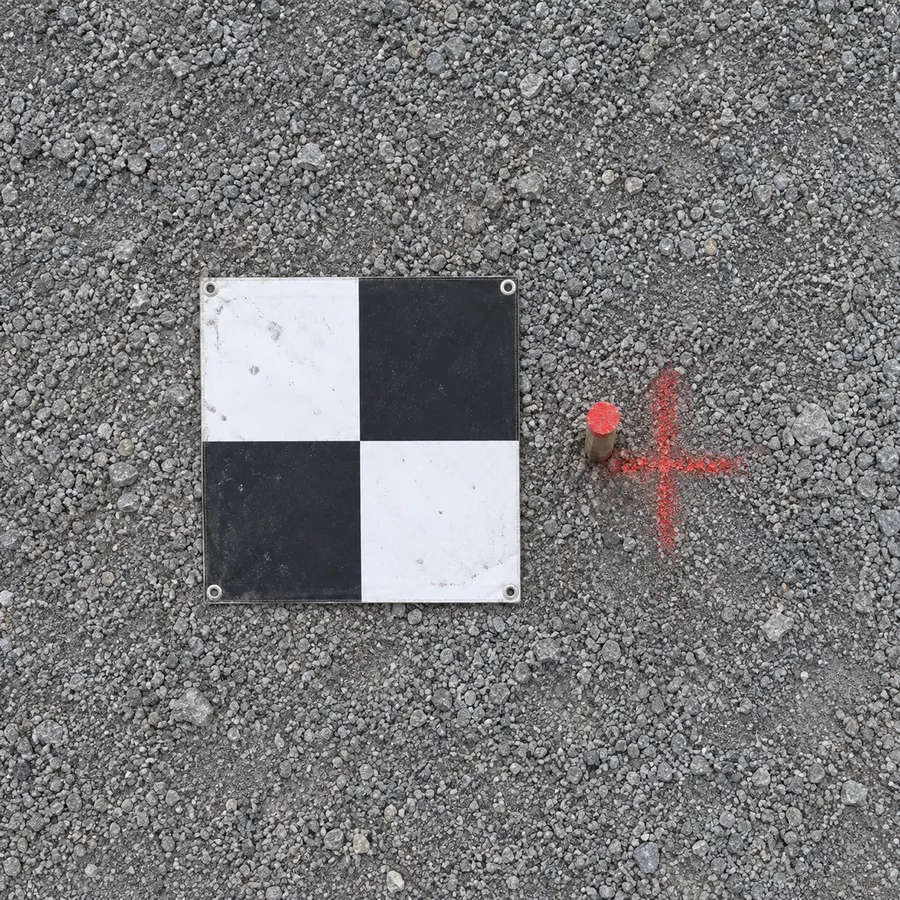
If you need sub-10 cm accuracy, GCPs are essential for achieving survey-grade results. Our GCP integration and processing service handles control point marking and verification as part of your dataset. Even if you don't use GCPs, checkpoints help validate your results.
- RTK Drones
- If you have an RTK-capable drone (e.g. DJI Mavic 3 Enterprise RTK, M300/M350 RTK), make sure it is connected to a network correction source before flying.
- How Many GCPs?
- Small site: 4–6. Large site: 6–12. Complex terrain: extra points on slopes and corners. Use at least 5–10 clearly marked, well-distributed GCPs across the site. More GCPs generally means better absolute accuracy.
- Placement Tips
- Spread GCPs evenly across the site — not just around the edges. Include at least one in the middle. Avoid clustering them in one area.
- GCP Target Size
- Targets should be at least 30×30 cm at typical mapping altitudes — larger if flying higher. Use high-contrast markings (e.g. a white cross on black, or purpose-made survey targets) so they're clearly visible in the imagery.
6.Capture Extra Photos Around Edges
Processing software struggles with trees, buildings, slopes, and stockpile edges. Fly an extra perimeter pass at a lower altitude and higher overlap to improve stitching and reduce wavy or blurred edges in your processed outputs.
7.Double-Check Your Data Before Leaving the Site
Re-flying on the spot is far easier than returning later.
- Check Your Photo Count
- Confirm the mission completed fully before packing up. Compare the expected image count against what was captured. Missing images mid-strip are much harder to fix later than doing a quick re-fly on the day.
- Review a Sample
- Flick through a handful of images on site to check for obvious blur, exposure issues, or missed GCPs. A couple of minutes of review can save a re-flight.
8.Export Your Photos Correctly
Correct export ensures accurate processing and geolocation.
- Export Checklist
- Keep original filenames. Export in JPG or RAW + JPG. Include EXIF metadata. Do not compress or resize images before uploading.
NZ-Specific Tips for Better Capture
- Watch for Wind Gusts
- NZ sites — especially rural or coastal — often have unpredictable gusts. Fly lower and slower if needed to maintain image sharpness.
- Avoid Bright White Surfaces
- Lime, sand, and concrete can blow out exposures. Use manual exposure to avoid overexposure on reflective stockpile surfaces.
- Be Mindful of CAA Rules
- Stay compliant with Part 101 and Part 102 (if applicable), and check local council restrictions before flying.
Checklist: Perfect Capture Flight
Tick items off as you go — handy on site.
Final Thoughts: Getting great processing results isn't about expensive gear — it's about consistent, repeatable capture technique. By following these NZ-specific best practices, you'll submit clean, high-quality imagery that processes reliably to survey-grade orthomosaic processing, DEM and DTM processing, and stockpile volume calculations every time.
Have questions about overlap, GCPs, file formats, or turnaround times?
See the FAQReady to upload your data?
Once you've captured your imagery using these guidelines, upload it directly through our secure portal.
Upload Your Data